Java进阶知识之注解的详细内容
2021-07-22 11:12:25
浏览数 (2956)
一、注解的概念
1、注解官方解释
注解
叫元数据,一种代码级别的说明,它是JDK1.5及以后版本引入的一个特性,与类、接口、枚举在同一个层次,它可以声明在包、类、字段、局部变量、方法参数等的前面,用来对这些元素进行说明、注释。
注解的作用分类
- 编写文档:通过代码里表示的元数据生成文档【生成doc文档】
- 代码分析:通过代码里表示的元数据进行分析【使用反射】
- 编译检查:通过代码里表示的元数据让编译器能够实现基本的编译检查【Override】
注解按照运行机制分类
- 源码注解:注解只在源码中存在,编译成.class文件之后就不存在了
- 编译时注解:注解在源码存在的基础上,也会在.class文件中存在,但是在运行阶段中就不存在了,例如:@Override
- 运行时注解:注解在运行阶段依然存在,且能够影响程序的运行过程,例如:@Autowired
2、注解与注释的区别
(1)注解:用于描述代码,说明程序,主要目的是为了给计算机看,且能够影响程序的运行。
(2)注释:用于描述代码的作用和一些关键性的知识点,使用文字描述程序,是为了给程序员观看,以此来使程序员能够以最快的时间了解被注释的代码。
二、内置注解与元注解
1、常用的内置注解
- @Override:检测该注解标记的方法是否继承自父类;
- @Deprecated:说明被标记的内容已过时,暗示着在不久之后可能会被更新抹除;
- @SuppressWarnings:压制警告,就是被标记的部分不会产生警告,常用的参数:@SuppressWarnings(“all”);
- @SafeVarargs:参数安全类型注解,它的目的就是提醒开发者不要用参数做一些不安全的操作,它的存在会阻止编译器产生unchecked这样的警告;
2、常用的元注解
元注解:用于描述注解的注解,在创建注解时使用
1. @Target属性值:
- ElementType.TYPE:能修饰类、接口或枚举类型
- ElementType.METHOD:能修饰方法
- ElementType.FIELD: 能修饰成员变量
- ElementType.PARAMETER:能修饰参数
- ElementType.CONSTRUCTOR:能够修饰构造器
- ElementType.ANNOTATION_TYPE:能够修饰注解
- ElementType.PACKAGE:能够修饰包
- ElementType.LOCAL_VARIABLE:能够修饰局部变量
2.@Retention属性值:
- RetentionPolicy.SOURCE:注解只在源码中存在,编译成class之后就没了
- RetentionPolicy.CLASS:注解在源码和class中都存在,运行时就没了,这个是Retention的默认值
- RetentionPolicy.RUNTIME: 注解在源码、class、运行时都存在,如果要使用反射一定要定义为这种类型
3.@Documented:该注解的作用就是表示此注解标记的注解可以包含到javadoc文件中去
4.@Inherited:描述注解是否能够被子类所继承
三、自定义注解
1、自定义注解基础知识
1.格式:
@Inherited//元注解public @interface zhujie{}2.注解本质:注解的本质上就是一个接口,该接口默认继承Annotation
public interface MyAnno extends java.lang.annotation.Annotion3.属性:接口中可以定义的内容(成员方法、抽象方法)
属性的返回值:
- 八种基本数据类型
- 字符串类、接口、枚举
- 注解
- 以上类型的数组
属性赋值注意事项
- 如果定义属性时,使用default关键字给属性默认初始化值,则使用注解时,就可以不进行属性的赋值,否则都必须给属性赋值
- 如果只有一个属性需要赋值的话,并且属性的名称是value,则使用注解给属性赋值时,value可以省略,直接定义值就可以了
- 数组赋值时,值需要使用{}包裹,如果数组中只有一个值,则{}可以省略不写
2、演示自定义注解的使用
自定义注解annotation
@Retention(value = RetentionPolicy.RUNTIME)
@Target(value = ElementType.TYPE)
public @interface annotation {
    String name() default "木鱼";
    int age();
    int[] score();
}
使用以上注解的类TestAnnotation
//name具有默认值,不需要必须为name赋值,但也可以重新赋值
@annotation(age=20,score={99,100,100})
public class TestAnnotation {

    public static void main(String[] args) throws ClassNotFoundException {
        Class clazz = Class.forName("test.TestAnnotation");
        annotation annotation = (annotation) clazz.getAnnotation(annotation.class);
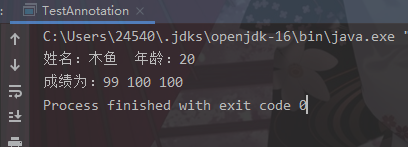
        System.out.println("姓名:"+annotation.name()+"  年龄:"+annotation.age());
        System.out.print("成绩为:");
        int[] score=annotation.score();
        for (int score1:score){
            System.out.print(score1+" ");
        }
    }

}
运行结果

3、演示注解在程序中的作用
两个方法:
- 类对象调用
isAnnotationPresent(Class<? extends Annotation> annotationClass)判断是否应用了某个注解 - 通过getAnnotation()方法获取Annotation对象,或者getAnnotations()方法获取所有应用在该类上的注解
1.创建自定义注解
@Retention(value = RetentionPolicy.RUNTIME)
@Target(value = ElementType.FIELD)
public @interface StringNull {

}
2.创建实体类
public class Student {
    @StringNull
    public String name=null;

    @StringNull
    public String xuehao=null;

    @StringNull
    public String sex=null;

    public void setName(String name) {
        this.name = name;
    }

    public void setXuehao(String xuehao) {
        this.xuehao = xuehao;
    }

    public void setSex(String sex) {
        this.sex = sex;
    }
}
3.创建测试类,测试注解
public class TestAnnotation {

    public static void main(String[] args) throws Exception{
        Class clazz = Class.forName("test.Student");
        Student student =(Student) clazz.newInstance();
        student.setName("小明");
        Field[] fields= clazz.getFields();
        for(Field f:fields){
            if(f.isAnnotationPresent(StringNull.class)){
                if(f.get(student)==null){
                    System.out.println(f.getName()+":是空的字符串属性");
                }else{
                    System.out.println(f.getName()+":"+f.get(student));
                }
            }
        }
    }
}
4.运行结果

以上就是关于 Java 进阶知识注解的全部内容,想要了解更多关于 Java 注解其他用法的资料请关注W3Cschool其它相关文章!如果本篇文章对您的学习有所帮助,还希望大家能够多多地支持我们!